This document contains a detailed walk-thru of what you need to
know to stage experiments on Narwhal using a combination of command line tools and a web browser.
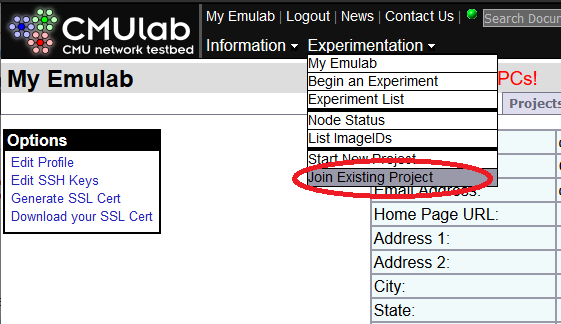 This will pull up the "Apply for Project Membership" form. Enter the
project name (and group, if provided) and click the "Submit" button.
Once your application to join the project is submitted, the project
head will be notified so that the request can be approved. This
is done manually, so it may take some time for the project head to
complete the process. The cluster will send you email when you have
been added to the project.
 If you click on the "image" experiment (under the "EID" column) it
will generate a table of all the nodes in the experiment and what
their current state is (e.g. SHUTDOWN, BOOTING, up). The experiment
is not considered to be fully ready until all nodes are in the "up"
state.
 Once the experiment is up, the
  Then click on the image you started from, e.g., UBUNTU18-64-PDLSTD in this example, and select
"Clone this image descriptor" on the Image Descriptor page:
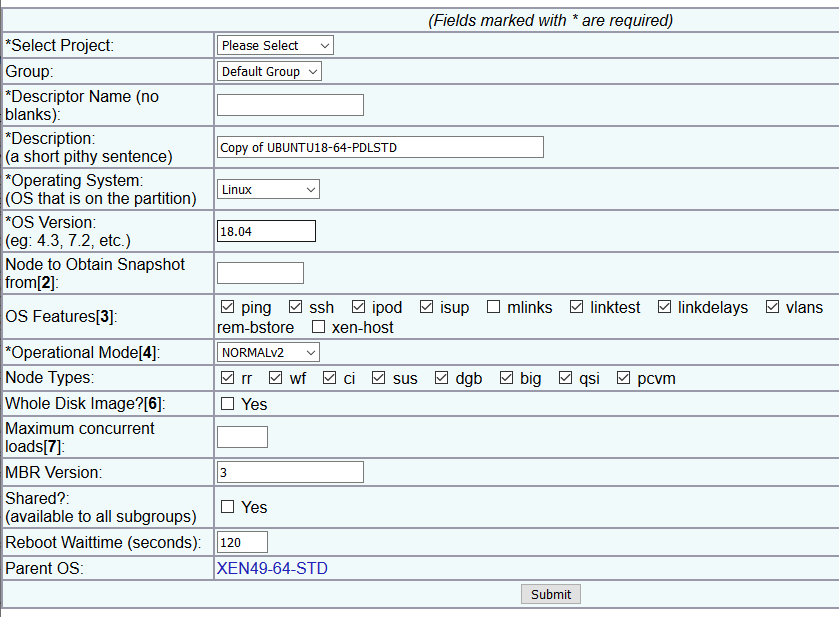
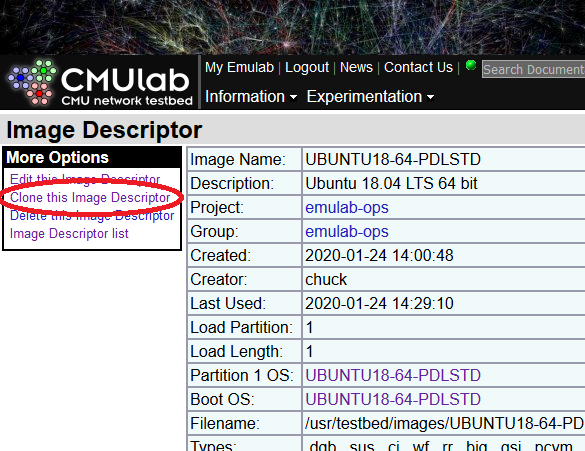 This will generate a form used to create a new disk image (shown
below). For a typical Linux image do the following:
  Once the disk image has been generated, the cluster will send you an
email and the new image will be added to the table on the "List
ImageIDs" web page. To test the new image with a single node experiment,
use
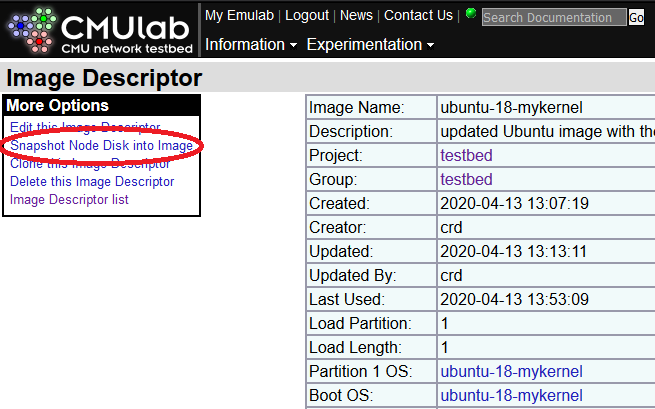
  In the table of available images, click on the image name of the image
you are updating ("ubuntu-18-mykernel" in our example). Then on that
image's web page, click on "Snapshot Node Disk into Image" under the
"More Options" menu:
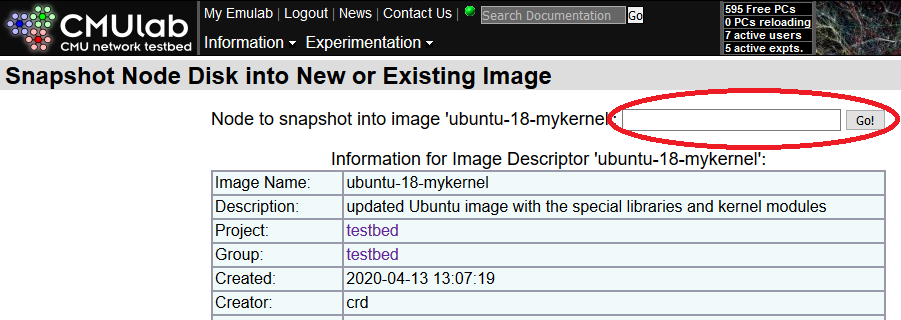
 This will bring up the snapshot form. Enter the physical node name in
the box, rr010 in our example, and click "Go!" to update the snapshot. Depending on the
size of the image, the snapshot update may take up to ten or so minutes to
complete.
 Once the snapshot is complete, the system will send you email and you
can dispose of the experiment using
 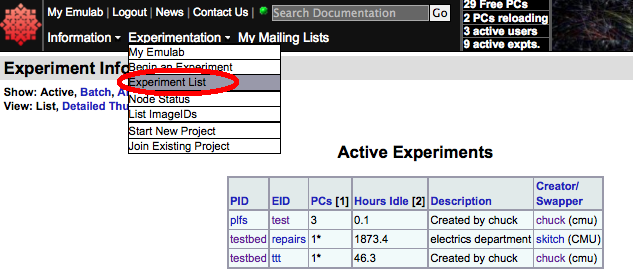 Then click on the "test" experiment (under EID) and it will generate a
web with the following table at the bottom:
 You can reload this web page as often as you like to check on the
experiment. When the experiment is fully up, you can easily check to
see if the generic startup script ran without an error on all the
nodes by checking the "Startup Status" column, as shown below. A
successful run of the startup script will put a zero in this column.
If you are working with a very large number of nodes,
then you can click on the "Startup Status" header at the top of the
table to sort it by startup status (e.g. so that all the failures are
clustered in one place).
 Once the systems are up, you can login to one of them to verify that
the generic startup script ran by checking for the
  Click on the "EID" of the experiment to change in the "Active
Experiments" table.
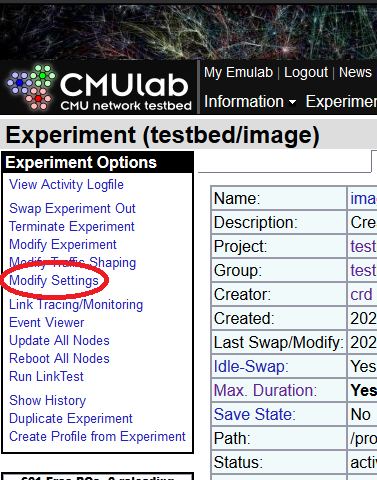
One the web page for the selected experiment comes up, select "Modify
Settings" from the menu on the left side of the page:
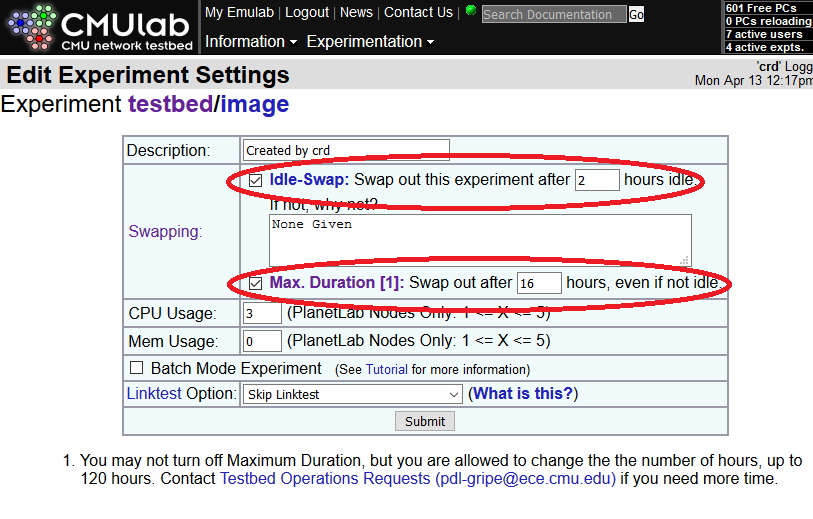
 This will produce the "Edit Experiment Settings" table. The two key
settings are:
Overview
There are four steps in the life cycle of running an experiment:- Join a project
- Select and customize an operating system
- Allocate a set of nodes, run experiments, and free the nodes
- Conclude project
Joining a project
All projects are created by a project head (typically a faculty member). After a project has been created, the project head will invite users to join the project by providing them with the name of the project and a link to cluster that is hosting the project. Project heads may also provide a group name in addition to the project name, if project subgroups are being used (subgroups are an optional feature, not all projects will use them). To join a project on Narwhal, go to https://narwhal.pdl.cmu.edu/ to get to the main web page. Login to the web page using your PDL account (if you do not have a PDL account on narwhal, you should contact the project head to learn how to get one). Now go to the "Experimentation" pulldown and select "Join Existing Project" from the menu. This will pull up the "Apply for Project Membership" form. Enter the
project name (and group, if provided) and click the "Submit" button.
Once your application to join the project is submitted, the project
head will be notified so that the request can be approved. This
is done manually, so it may take some time for the project head to
complete the process. The cluster will send you email when you have
been added to the project.
Accessing the cluster
After you have successfully joined a project you can use ssh to log in to the cluster's operator ("ops") node:ssh ops.narwhal.pdl.cmu.edu
(NOTE: use ssh your_narwhal_username@ops.narwhal.pdl.cmu.edu if it differs from your current username)
On ops you will have access to your home directory in /users/ and
your project directory in /proj. Space in /users/ is limited by
quota, so it is a good idea to put most of your project related files
in your new project's directory in /proj. The /proj directory can
be read and written by all the users who are members of your project.
Ops also contains the /share directory. This directory is mounted
by all the nodes and is shared across all projects. On Narwhal we
keep shared control scripts in /share/testbed/bin.
Selecting and customizing an operating system
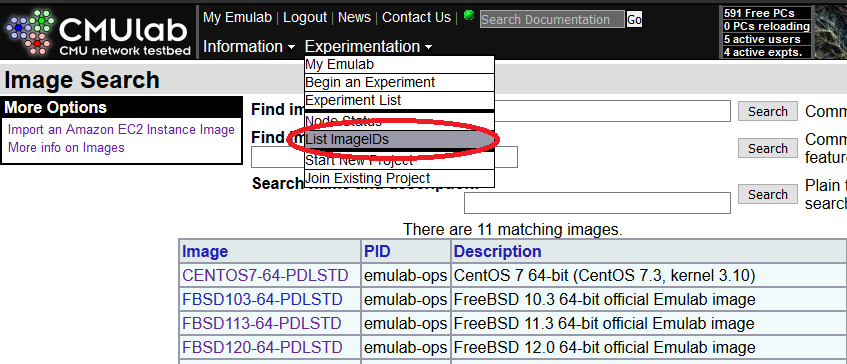
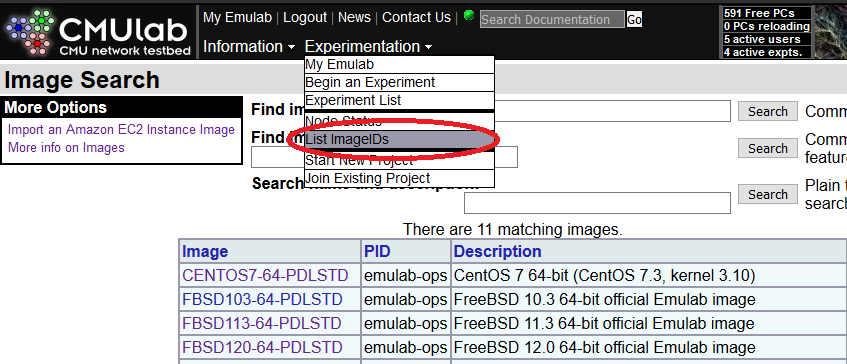
The next step is to select an operating system image to start with and then customize it with any additional software or configuration that you need to run your experiment. If you do not need to customize the operating system image, you can skip this step and just use one of the standard images. Narwhal comes with a number of operating system images setup for general use. To view the list of operating systems available on the cluster, click on the "List ImageIDs" menu item from the "Experimentation" pulldown menu. The figure below shows the menu and the table it produces below. Use the table to determine the name of operating system image you want to use. For example, UBUNTU18-64-PDLSTD is a 64 bit version of Ubuntu Linux 18.04 with minimal customizations for the PDL environment.
Customizing an operating system image
Once you have chosen an operating system image to use, you can now use it to build a customized operating system image with any additional software you need installed in it. The steps to do this are:- create a single node experiment running the base operating system image using the
makebedscript - login to the node and get a root shell
- use a package manager (
apt-get,yum, etc.) to install/configure software - manually add any local software to the image
- logout
- determine the physical name of the host your single node experiment is on
- generate a new operating system image from that host
- shutdown and delete the single node experiment
makebed script found in
/share/testebed/bin. On PDL Emulab systems with more than one type of
experimental node we have a copy of makebed for each node type. For example,
on Narwhal to use an RR node for your experiment you would use the /share/testbed/bin/rr-makebed
version of the makebed script. See the main Narwhal wiki page for
a table of node types currently available on Narwhal. For the examples here,
we select the RR node type by using rr-makebed.
Here is a log of creating a new image under a project
named "testbed" based on the UBUNTU18-64-PDLSTD Linux image. First we log
into the Narwhal operator node ops.narwhal.pdl.cmu.edu. Next we use the
rr-makebed script to create a single node experiment named
"image" under the "testbed" project running UBUNTU18-64-PDLSTD with 1
node. Note that if you have been assigned a subgroup in your project
that you want to use, you must specify the subgroup name with the "-g"
flag to rr-makebed when creating new experiments (you only have
to specify the group name when creating new experiments).
ops> /share/testbed/bin/rr-makebed -p testbed -e image -i UBUNTU18-64-PDLSTD -n 1
rr-makebed running...

        base = /usr/testbed
        exp_eid = image
        proj_pid = testbed
        features = rr
        group =
        host_base = h
        image = UBUNTU18-64-PDLSTD
        nodes = 1
        startcmd =

making a cluster with node count = 1

generating ns file...done (/tmp/tb67744-97086.nsfile).

loading ns file as an exp... done!
swapping in the exp...

all done (hostnames=h0.image.testbed)!
Starting an expermient can take anywhere from 5 to 20 minutes
depending on the number of nodes requested and the state of the
hardware. To check the status of the experiment being created, click
on the "Experiment List" menu item from the "Experimentation" pulldown
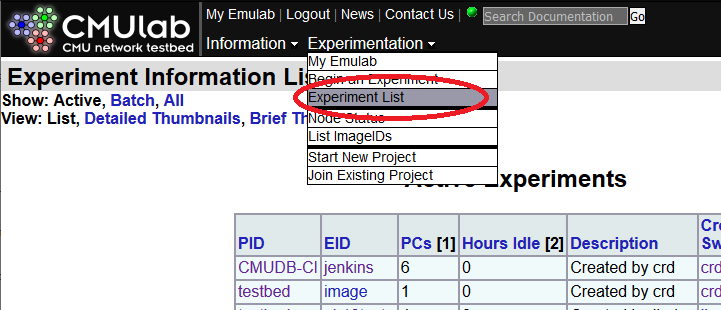
menu. This will generate a table of "Active Experiments":
 If you click on the "image" experiment (under the "EID" column) it
will generate a table of all the nodes in the experiment and what
their current state is (e.g. SHUTDOWN, BOOTING, up). The experiment
is not considered to be fully ready until all nodes are in the "up"
state.
 Once the experiment is up, the
 rr-makebed script will print "all
done" and you can then login to the experiment's node. The
rr-makebed script normally names hosts as hN.EID.PID where N
is the host number, EID is the name of the experiment, and PID is the
project name. In the above example, the name of the single node in
the experiment is h0.image.testbed and a root shell can be accessed
like this from the operator node:
swapping in the exp...

all done (hostnames=h0.image.testbed)!
ops> ssh h0.image.testbed
Welcome to Ubuntu 18.04.1 LTS (GNU/Linux 4.15.0-70-generic x86_64)

 * Documentation:  https://help.ubuntu.com
 * Management:     https://landscape.canonical.com
 * Support:        https://ubuntu.com/advantage


 * Canonical Livepatch is available for installation.
   - Reduce system reboots and improve kernel security. Activate at:
     https://ubuntu.com/livepatch

h0> sudo -i
root@h0:~#
Now that the node is up and you have a root shell, you can use the
standard package managers (apt-get, yum, etc.) to install any missing
third party software that you need. While the nodes themselves do not
have direct access to the Internet, the package managers in the
operating system images provided by Narwhal have been preconfigured to
use a web proxy server to download packages.
One type of package that may be especially useful to have installed on
your nodes is a parallel shell command such as mpirun or pdsh.
These commands allow you to easily run a program on all the nodes in
your experiment in parallel and can make the experiment easier to
manage. If they are not already installed in your image, you can
install them using a package manager:
apt-get -y install pdsh
apt-get -y install openmpi-bin
or
yum install pdsh
yum install openmpi
etc... In addition to installing packaged third party software, you can also manually install other third party or local software on the node. In order to do this, you must first copy the software from your home system to the ops node (either in your home directory, or in your project's
/proj directory). Once the software distribution is on the
ops node, you can access and install it on the local disk of the node
in your experiment so that it will be part of your custom operating
system image.
Generally, it makes sense to put software that does not change
frequently in your custom disk image. It is not a good idea to embed
experimental software that is frequently recompiled and reinstalled in
your custom image as you will likely end up overwriting it with a
newer version. It is best to keep software that changes often in your
project's /proj directory and either run it from NFS on the nodes or
use a parallel shell to install the most recent copy on the node's
local disk before running it.
Once you are satisfied with the set of extra software installed on the
node, then it is time to generate a customized disk image of that
installation. Exit the root shell on the node and log off. Then
determine the physical node name of the machine that is running your
single node experiment by using either the web interface or the "host"
command on ops:
ops> host h0.image.testbed
h0.image.testbed.narwhal.pdl.cmu.edu is an alias for rr335.narwhal.pdl.cmu.edu.
rr335.narwhal.pdl.cmu.edu has address 10.111.2.79
ops>
In this case, h0.image.testbed is running on node rr335. NOTE: the following instructions should be used to create your image if you started from one that you do not have privileges to overwrite, e.g., one of the
-PDLSTD images. If you started from an image that is already owned by you or your project, and you simply want overwrite that same image with the update, skip to these instructions instead.
Now go to the back to the cluster web pages and click on the "List
ImageIDs " menu item from the "Experimentation" pulldown menu:
 Then click on the image you started from, e.g., UBUNTU18-64-PDLSTD in this example, and select
"Clone this image descriptor" on the Image Descriptor page:
 This will generate a form used to create a new disk image (shown
below). For a typical Linux image do the following:
 - Select the project that will own the image
- Make up a descriptor name, "ubuntu-18-mykernel", for example
- Write a short description of the image, e.g., "updated Ubuntu image with the special libraries and kernel modules"
- Set the OS and OS versions, e.g., "Linux" and "18.04"
- Under "node to obtain snapshot from" enter the physical node name ("rr335" in our example)
 Once the disk image has been generated, the cluster will send you an
email and the new image will be added to the table on the "List
ImageIDs" web page. To test the new image with a single node experiment,
use
 rr-makebed with the "-i" option to specify your new image:
ops> /share/testbed/bin/rr-makebed -e imagetest -p testbed -i ubuntu-18-mykernel -n 1
rr-makebed running...

        base = /usr/testbed
        exp_eid = imagetest
        proj_pid = testbed
        features = rr
        group =
        host_base = h
        image = ubuntu-18-mykernel
        nodes = 1
        startcmd =

making a cluster with node count = 1

generating ns file...done (/tmp/tb1612-97737.nsfile).

loading ns file as an exp... done!
swapping in the exp...

all done (hostnames=h0.imagetest.testbed)!
ops> ssh h0.imagetest.testbed
Warning: Permanently added 'h0.imagetest.testbed' (ECDSA) to the list of known hosts.
Welcome to Ubuntu 18.04.1 LTS (GNU/Linux 4.15.0-70-generic x86_64)

 * Documentation:  https://help.ubuntu.com
 * Management:     https://landscape.canonical.com
 * Support:        https://ubuntu.com/advantage


 * Canonical Livepatch is available for installation.
   - Reduce system reboots and improve kernel security. Activate at:
     https://ubuntu.com/livepatch
Failed to connect to https://changelogs.ubuntu.com/meta-release-lts. Check your Internet connection or proxy settings
h0> sudo -i
root@h0:~#
The h0.imagetest.testbed node should boot up with all the custom third party
software you installed in the image ready to run.
Dispose of the image test experiment using the "-r" flag to rr-makebed:
ops> /share/testbed/bin/rr-makebed -e imagetest -p testbed -r
rr-makebed running...

        base = /usr/testbed
        exp_eid = test
        proj_pid = testbed
        remove = TRUE!

removing experiment and purging ns file...   done!
ops>
Finally, use the rr-makebed command to release the experiment used to
generate the custom image:
/share/testbed/bin/rr-makebed -e image -p testbed -r
Updating a customized operating system image
Sometimes you need to update a customized operating system image that you have previously created (e.g to add or upgrade software in the image). The procedure for doing this is as follows. First, create a single node experiment of the image you want to modify and log into it (don't forget to add a "-g group" arg torr-makebed if you want to
use a subgroup):
ops> /share/testbed/bin/rr-makebed -e imageup -p testbed -i ubuntu-18-mykernel -n 1
rr-makebed running...

        base = /usr/testbed
        exp_eid = imageup
        proj_pid = testbed
        features = rr
        group =
        host_base = h
        image = ubuntu-18-mykernel
        machine =
        nodes = 1
        startcmd =

making a cluster with node count = 1

generating ns file...done (/tmp/tb29518-97882.nsfile).

loading ns file as an exp... done!
swapping in the exp...

all done (hostnames=h0.imageup.testbed)!
ops> ssh h0.imageup.testbed
Warning: Permanently added 'h0.imageup.testbed' (ECDSA) to the list of known hosts.
Welcome to Ubuntu 18.04.1 LTS (GNU/Linux 4.15.0-70-generic x86_64)

 * Documentation:  https://help.ubuntu.com
 * Management:     https://landscape.canonical.com
 * Support:        https://ubuntu.com/advantage


 * Canonical Livepatch is available for installation.
   - Reduce system reboots and improve kernel security. Activate at:
     https://ubuntu.com/livepatch
Failed to connect to https://changelogs.ubuntu.com/meta-release-lts. Check your Internet connection or proxy settings

h0> sudo -i
root@h0:~#
Next, add or modify the software on the single node experiment as
needed. Then log out and determine the physical name of the node the
experiment is running on using the web interface or the "host" command on ops:
ops> host h0.imageup.testbed
h0.imageup.testbed.narwhal.pdl.cmu.edu is an alias for rr010.narwhal.pdl.cmu.edu.
rr010.narwhal.pdl.cmu.edu has address 10.111.1.10
ops>
Then go to the cluster web page and click on the "List ImageIDs" menu item from the "Experimentation" pulldown menu:
 In the table of available images, click on the image name of the image
you are updating ("ubuntu-18-mykernel" in our example). Then on that
image's web page, click on "Snapshot Node Disk into Image" under the
"More Options" menu:
 This will bring up the snapshot form. Enter the physical node name in
the box, rr010 in our example, and click "Go!" to update the snapshot. Depending on the
size of the image, the snapshot update may take up to ten or so minutes to
complete.
 Once the snapshot is complete, the system will send you email and you
can dispose of the experiment using
 rr-makebed with "-r":
/share/testbed/bin/rr-makebed -e imageup -p testbed -r
Allocating a set of nodes, running experiments, freeing the nodes
Once you have prepared an operating system image, you are now ready to start running multi-node experiments on the cluster using it.Node allocation
Multi-node experiments can easily be allocated using the "-n" flag of the rr-makebed script. For example:/share/testbed/bin/rr-makebed -e exp -p plfs -i ubuntu-12-64-plfs -n 64This command will create a 64 node experiment with hostnames
h0.exp.plfs,
h1.exp.plfs, etc. all the way to h63.exp.plfs running the
ubunutu-12-64-plfs operating system image. (Don't forget to add a
"-g group" flag to rr-makebed if you want to use a specific
subgroup in a project.)
Note that each time an experiment is created, a new set of nodes
is allocated from the free machine pool and initialized with the
specified operating system image. Local node storage is not preserved
when you delete an experiment and then recreate it later. Local storage
is also not preserved if the cluster swaps your experiment out for being
idle for too long. Always save critical data to a persistent storage
area such as your project's /proj directory.
Boot time node configuration
It is common to want to do additional node configuration on the nodes as part of the boot process. For example, you may want to:- setup a larger local filesystem on each node
- setup passwordless ssh for the root account
- configure a high speed network (if available)
- allow short hostnames to be used (e.g.
h0vsh0.exp.plfs) - change kernel parameters (e.g. VM overcommit ratios)
rr-makebed to
specify a startup script to run as part of the boot process.
The /share/testbed/bin/generic-startup script is a sample startup script that
you can copy into your own directory and customize for your
experiment. The generic-startup script runs a series of helper
scripts like this:
#!/bin/sh -x
exec > /tmp/startup.log 2>&1

#############################################################################
# first, the generic startup stuff
#############################################################################

sudo /share/testbed/bin/linux-fixpart all                     || exit 1
sudo /share/testbed/bin/linux-localfs -t ext4 /l0             || exit 1

sudo /share/testbed/bin/localize-resolv                       || exit 1

# generate key: ssh-keygen -t rsa -f ./id_rsa
/share/testbed/bin/sshkey                                     || exit 1

sudo /share/testbed/bin/network --big --eth up                || exit 1

echo "startup complete."
exit 0
The
exec command at the beginning of the script is used to redirect
the script's standard output and standard error streams to the file
/tmp/startup.log. This allows you to login and review the script's
output for error messages if it exits with non-zero value (indicating
an error). Note that the script runs under your account, so it uses
the "sudo" command for operations that require root privileges.
The next two commands (linux-fixpart and linux-localfs) create
and mount a new local filesystem. Systems disks on the nodes are
configured with four partitions. The first three are normally fixed
in size and used for operating system images and swapping. They
typically take up the first 13GB of the system disk. The disk's
fourth partition is free and can be used to create additional local
storage on the remainder of the disk.
The linux-fixpart command checks to make sure the fourth partition is
setup properly on the system disk, or for non-boot disks it makes one
big partition. This script takes one argument than can be a disk
device (e.g. /dev/sdb), the string "all," or the string "root." For
the "all" setting, the script runs on all local devices matching the
"/dev/sd?" wildcard expression. The "root" setting is a shorthand for
the disk where "/" resides.
The linux-localfs command creates a filesystem of the given size on
the fourth partition of the system disk and mounts it on the given
mount point (/l0). The size can be expressed in terms of gigabytes
(e.g. "64g"), megabytes (e.g. "16m"), or the default of 1K blocks. If
a size is not given, then the script uses the entire partition. In
addition to the system disk, some nodes may have additional drives
that experiments can use (see the main Narwhal wiki page for hardware
details). This script has two flags. The "-d device" flag allows you
to specify a device ("root" is the default, and is an alias for the
system disk). The "-t type" allows you to specify a filesystem type
(the default is "ext2").
The localize-resolv script modifies /etc/resolv.conf on a node
to allow for short hostnames to be used (by updating the "search"
line). This allows you to use short hostnames like h0 instead of
h0.image.plfs in all your scripts and configuration files.
The sshkey command sets up passwordless ssh access for the root
account on the nodes. By default it uses a built in RSA key with a
null pass phrase, but you can also specify your own id_rsa key file on
the command line if you don't want to use the default key.
Finally the network script is used to configure additional
network interfaces on the nodes. By default, each node
only has one network interface configured and that interface is the
control ethernet network. Currently that is the only network
we are using.
The "--big" flag may be useful when you are communicating
with a large number of nodes and overflowing the kernel ARP table (the
Linux kernel will complain with a "Neighbor table overflow" error).
In addition to configuring data network interfaces, the
network script also adds hostnames to /etc/hosts for these
interfaces.
Example node allocation
Here is an example of allocating a three node experiment named "test" under the "plfs" project using theubuntu10-64-plfs-v2 image with
the generic startup script shown above:
% /share/testbed/bin/rr-makebed -n 3 -e test -p plfs -i ubuntu10-64-plfs-v2 -s /share/testbed/bin/generic-startup
rr-makebed running...

        base = /usr/testbed
        exp_eid = test
        features =
        host_base = h
        image = ubuntu10-64-plfs-v2
        nodes = 3
        proj_pid = plfs
        startcmd = /share/testbed/bin/generic-startup

making a cluster with node count = 3

generating ns file...done (/tmp/tb.pbed.68767.ns).

loading ns file as an exp... done!
swapping in the exp...

all done (hostnames=h[0-2].test.plfs)!
%
To check the status of the experiment as it comes up, click on the
"Experiment List" menu item from the "Experimentation" pulldown menu.
This will generate a table of "Active Experiments":
 Then click on the "test" experiment (under EID) and it will generate a
web with the following table at the bottom:
 You can reload this web page as often as you like to check on the
experiment. When the experiment is fully up, you can easily check to
see if the generic startup script ran without an error on all the
nodes by checking the "Startup Status" column, as shown below. A
successful run of the startup script will put a zero in this column.
If you are working with a very large number of nodes,
then you can click on the "Startup Status" header at the top of the
table to sort it by startup status (e.g. so that all the failures are
clustered in one place).
 Once the systems are up, you can login to one of them to verify that
the generic startup script ran by checking for the
 /l0 filesystem
or testing that passwordless root ssh works:
ops> ssh h2.test.plfs
Linux h2.test.plfs.narwhal.pdl.cmu.edu 2.6.32-24-generic #38+emulab1 SMP Mon Aug 23 18:07:24 MDT 2010 x86_64 GNU/Linux
Ubuntu 10.04.1 LTS

Welcome to Ubuntu!
 * Documentation:  https://help.ubuntu.com/
Last login: Fri Feb 22 14:29:59 2013 from ops.narwhal.pdl.cmu.edu
h2> ls /tmp/startup.log
/tmp/startup.log
h2> df /l0
Filesystem           1K-blocks      Used Available Use% Mounted on
/dev/sda4            66055932K    53064K 62647428K   1% /l0
h2> sudo -H /bin/tcsh
h2:/users/chuck# ssh h0 uptime
 14:30:33 up 49 min,  0 users,  load average: 0.01, 0.01, 0.00
h2:/users/chuck# ping -c 1 h0
PING rr122.narwhal.pdl.cmu.edu (10.111.1.122) 56(84) bytes of data.
64 bytes from rr122.narwhal.pdl.cmu.edu (10.111.1.122): icmp_seq=1 ttl=64 time=0.151 ms

--- rr122.narwhal.pdl.cmu.edu ping statistics ---
1 packets transmitted, 1 received, 0% packet loss, time 0ms
rtt min/avg/max/mdev = 0.151/0.151/0.151/0.000 ms
h2:/users/chuck#
Running experiments
Once your experiment has been allocated and the boot-time initialization has successfully run on all the nodes, then you are ready to run your software on the nodes. While the details of how to do this depend on the kinds of software being used, the general pattern for running an experiment on the nodes is:- start up your application on the nodes
- benchmark, simulation, or test the application
- collect and save results
- shutdown your application on the nodes
/share/testbed/bin/emulab-listall will print a list of all the
hosts in your current experiment:
h2:/# /share/testbed/bin/emulab-listall
h0,h1,h2
h2:/#
The output of
emulab-listall can be used to dynamically start or
shutdown applications without having to hardwire the number of nodes
or their hostnames. The "--separator" flag to emulab-listall can
be used to change the string separator between hostnames to something
other than a comma.
For small experiments, starting or shutting down your application one
node at a time may be fast enough, but it may not scale well for for
larger experiments (e.g. a thousand node experiment). In this
case, it pays to use a parallel shell such as mpirun or pdsh to
control your application. The script
/share/testbed/bin/emulab-mpirunall is a simple example frontend to the
mpirun command that passes in the list of hostnames of the current
experiment. Here is an example of using this script to print the hostname
of each node in the experiment in parallel:
h2:/# /share/testbed/bin/emulab-mpirunall hostname
mpirunall n=3: hostname
h2.test.plfs.narwhal.pdl.cmu.edu
h1.test.plfs.narwhal.pdl.cmu.edu
h0.test.plfs.narwhal.pdl.cmu.edu
h2:/#
A more practical example is to use a script like
emulab-mpirunall to
run an init-style application start/stop script across all the nodes
in the experiment in parallel. The exit value of mpirun can be used to
determine if there were any errors.
Resetting the operating system on allocated nodes
Sometimes in the course of performing experiments or operating system customization, a node will fail to reboot into a working state. If this happens, you can use theos_load program to reinstall the operating system on that allocated node to a default state. This provides a much less invasive way of recovering a botched node than modifying the experiment, or terminating and restarting it. Ensure that /usr/testbed/bin/ in your shell's PATH, and then invoke os_load from the ops node:
$ export PATH=/usr/testbed/bin:$PATH
$ os_load
os_load [options] node [node ...]
os_load [options] -e pid,eid
where:
    -i    - Specify image name; otherwise load default image
    -p    - Specify project for finding image name (-i)
    -s    - Do *not* wait for nodes to finish reloading
    -m    - Specify internal image id (instead of -i and -p)
    -r    - Do *not* reboot nodes; do that yourself
    -c    - Reload nodes with the image currently on them
    -F    - Force; clobber any existing MBR/partition table
    -e    - Reload all nodes in the given experiment
  node    - Node to reload (pcXXX)

Wrapper Options:
    --help      Display this help message
    --server    Set the server hostname
    --port      Set the server port
    --login     Set the login id (defaults to $USER)
    --cert      Specify the path to your testbed SSL certificate
    --cacert    The path to the CA certificate to use for server verification
    --verify    Enable SSL verification; defaults to disabled
    --debug     Turn on semi-useful debugging
For example, in order to reinstall node ci031 with UBUNTU18-64-PDLSTD, do:
$ os_load -i UBUNTU18-64-PDLSTD ci031
osload (ci031): Changing default OS to [OSImage emulab-ops,UBUNTU18-64-PDLSTD 10031:0]
Setting up reload for ci031 (mode: Frisbee)
osload: Issuing reboot for ci031 and then waiting ...
reboot (ci031): Attempting to reboot ...
Connection to ci031.narwhal.pdl.cmu.edu closed by remote host.
command-line line 0: Bad protocol spec '1'.
reboot (ci031): Successful!
reboot: Done. There were 0 failures.
reboot (ci031): child returned 0 status.
osload (ci031): still waiting; it has been 1 minute(s)
osload (ci031): still waiting; it has been 2 minute(s)
osload (ci031): still waiting; it has been 3 minute(s)
osload: Done! There were 0 failures.
Authorization checks are performed beforehand, and this command only works for nodes that are already allocated to an experiment in a project where you are a member.
Freeing the nodes
Before you free your nodes, make sure you have copied all important data off of the nodes' local storage into your project's/proj directory. Data stored on the nodes' local disk is
not preserved and will not be available once the nodes are freed.
To free your nodes, use the "-r" flag to rr-makebed:
ops> /share/testbed/bin/rr-makebed -e test -p plfs -r
rr-makebed running...

        base = /usr/testbed
        exp_eid = test
        remove = TRUE!

removing experiment and purging ns file...   done!
ops>
This operation shuts down all your nodes and puts them back in the
system-wide free node pool for use by other projects.
Issues to watch for
There are a number of points to be aware of and watch for when using the Narwhal cluster.Using the wrong network for experiments
Many types of nodes have more than one network interface. For example, SUS nodes have both 1GB and 40GB ethernet networks. Applications that require high-performance networking in order to perform well should use addresses on the faster 40GB network for their application-level data. Using the wrong (e.g. 1GB) addresses could result in unexpected poor performance. To check network usage under Linux, use the/sbin/ifconfig -a command and look at the "RX
bytes" and "TX bytes" for each interface. If you think you are
running your experiments over 40GB ethernet and the counters on the 40GB
interface are not increasing, then something is not configured
properly.
Not copying result data to persistent storage
Applications that collect performance measurements or test data should save their results on persistent storage (e.g., your project's/proj
directory) before the nodes are released or swapped out due to being
idle for too long. Data on local drives is not preserved after an
experiment is shutdown.
Allowing an experiment to be shutdown for being idle or running too long
Emulab monitors all allocated nodes to ensure that they are being used. If an experiment sits idle for too long, then it is shutdown ("swapped out") so other users can use the idle nodes. To avoid this it is best to keep track of how long your allocated nodes are idle. The system also limits the overall lifetime (duration) of an experiment. If you need to increase the idle timeout, this can be done by changing the experiment settings. Click on the "Experiment List" menu item from the "Experimentation" pulldown menu. This will generate a table of "Active Experiments": Click on the "EID" of the experiment to change in the "Active
Experiments" table.
One the web page for the selected experiment comes up, select "Modify
Settings" from the menu on the left side of the page:
 This will produce the "Edit Experiment Settings" table. The two key
settings are:
 - Idle-Swap
- Max Duration

Hardware problems
Given the number of machines in the Narwhal clusters, there is a chance that you may encounter a node with hardware problems. There are a number of ways these kinds of problems can manifest themselves. Here is a list of symptoms to be aware of:- Hung node: Node stops responding to network requests and shows up as "down"
- Crashed node: Node crashes and reboots, killing anything currently running on it
- Dead data network interface: Node boots, but is unable to communicate over a data network (e.g. Infiniband)
- Kernel errors: The kernel runs, but logs errors to the system log/console
dmesg command.
To report a possible hardware issue, use the system contact
information on the cluster web page.
Concluding a project
Once you have finished using the cluster, you should:- copy all important data from ops to your local system
- reduce your disk space so it is available for others to use
- let the head of your project know your work is complete and your part of the project can be deactivated
 Copyright © by the contributing authors. All material on this collaboration platform is the property of the contributing authors.
 Ideas, requests, problems regarding PDLWiki? Send feedback